We offer a wide collection of free, high-quality printable coloring pages for kids and adults. From cute animals to intricate mandalas, our designs bring creativity and relaxation to everyone. Download, print, and start coloring today!

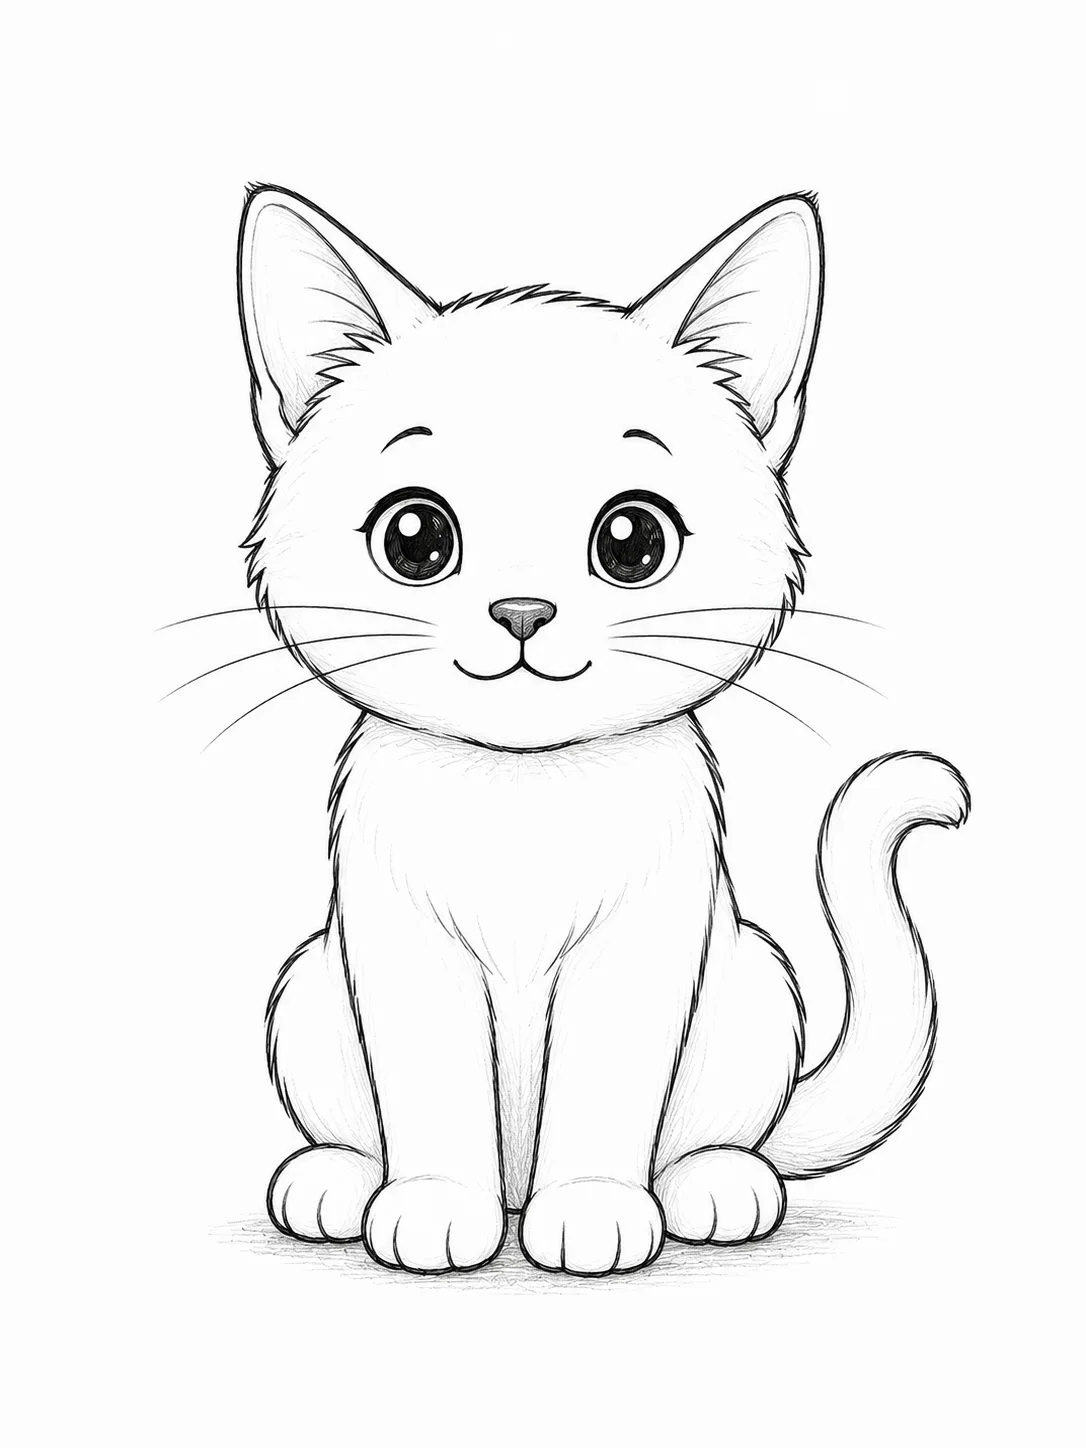
Cats are one of the most enjoyable animals to draw because their bodies can be built from a few simple shapes before adding the fun details. Whether you’re a child picking up a pencil for the first time or an adult learning to sketch, this lesson breaks every stage into small, easy-to-follow steps. Instead of worrying about making everything perfect, you’ll focus on creating a balanced outline first and refining it little by little. By the end of the tutorial, you’ll have a friendly sitting cat with expressive eyes, pointed ears, and a curved tail. If you’d like to explore even more beginner-friendly animal tutorials afterward, visit our complete collection in How to Draw Cute Animals.
Table of Contents
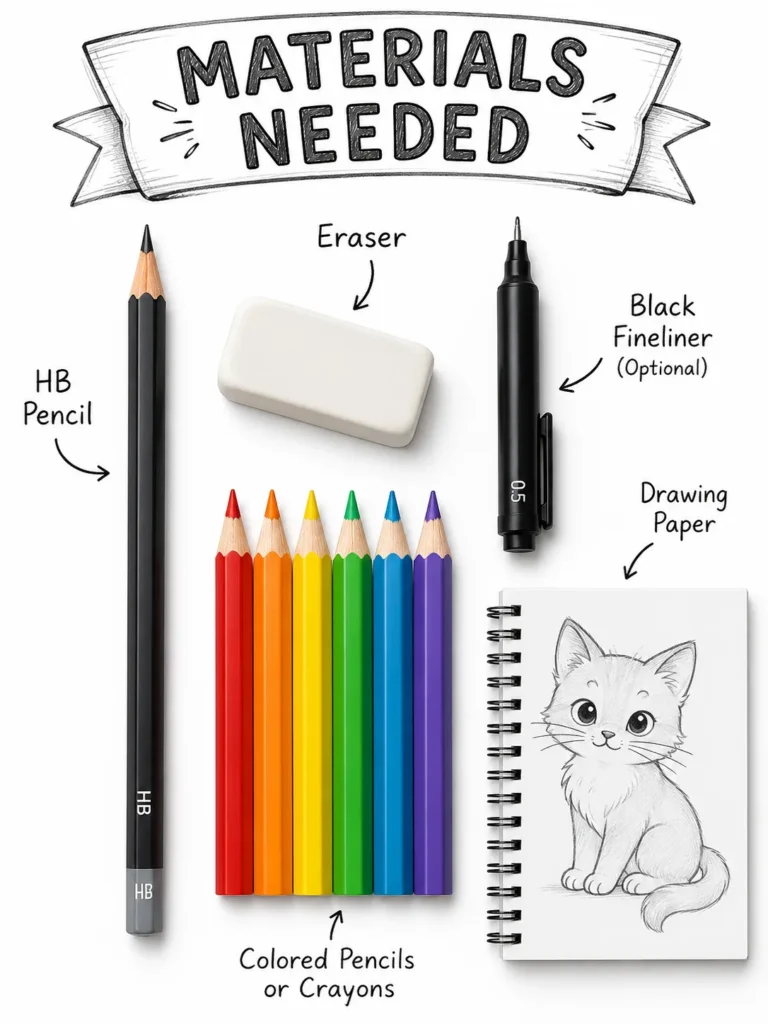
Materials Needed
- HB pencil
- Eraser
- Black fineliner (optional)
- Colored pencils or crayons
- Drawing paper
How to Draw a Cat Step By Step
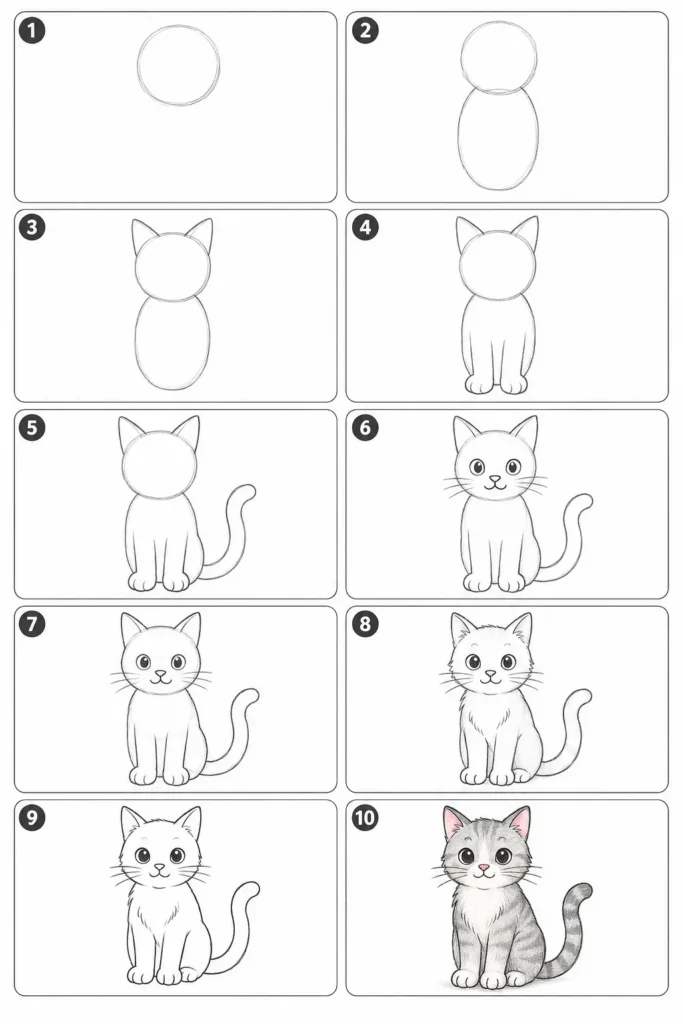
Step 1 – Draw a Circle for the Head
Every good drawing starts with a simple guide shape. Begin by lightly sketching a medium-sized circle near the upper half of your paper. This circle doesn’t need to be perfectly round, but it should be large enough to leave room below for the body. Keeping your pencil strokes light makes it much easier to adjust the shape later without leaving dark marks. Many beginners press too hard at this stage, making corrections difficult. Think of this circle as a map rather than the final head. A useful trick is to rotate your paper while drawing curved lines instead of twisting your wrist. This often produces a smoother shape and helps your future cat look balanced from the very beginning.
Step 2 – Add the Body
Under the head, draw a slightly larger oval that overlaps the bottom of the circle just a little. This oval becomes the cat’s chest and body, helping establish the overall proportions before any details are added. Try to keep the body centered beneath the head so your cat appears to be sitting naturally. A common mistake is drawing the body much wider than the head, which can make the finished animal look unbalanced. Instead, compare the width of both shapes as you work. Looking at the drawing from arm’s length every minute or two is an easy way to notice if anything is leaning to one side before moving forward.
Step 3 – Draw the Ears
Place two pointed triangles on top of the head to create the cat’s ears. Position one on each side with a small gap between them so they look symmetrical. The ears should tilt slightly outward instead of standing perfectly straight. This gives your cat a softer, friendlier appearance. Avoid making the ears extremely large, since oversized ears can make the proportions feel more like a kitten or another animal. If you’re unsure about the size, lightly sketch both ears before darkening any lines. Working with gentle construction lines allows you to compare both sides and make adjustments until they match comfortably.
Step 4 – Sketch the Front Legs
From the lower part of the body, draw two straight but slightly curved front legs extending downward. Keep the legs close together to create the look of a relaxed sitting cat. At the bottom of each leg, round the ends gently to suggest soft paws instead of sharp corners. Many beginners make the legs too thin, making the cat appear fragile. A little extra width creates a sturdier and more natural-looking figure. Compare both legs often to make sure they are about the same length. If one becomes longer, simply erase the end and redraw it before adding more details.
Step 5 – Add the Tail
Finish the basic body shape by drawing a long curved tail beginning from one side of the body. Sweep the tail outward before curling it gently upward. A flowing curve makes the drawing feel more lively than a stiff straight line. Keep the tail about as long as the body without making it overly thick. Beginners sometimes attach the tail too high on the back, but it should begin near the lower rear of the body. Before moving to facial details, take a moment to look over the entire outline. Small corrections are much easier now than after all the features have been added. If you enjoy drawing friendly pets, you may also like our guide on How to Draw a Dog or woodland animals in How to Draw a Fox.
Step 6 – Draw the Face
With the basic outline complete, it’s time to give your cat a friendly expression. Start by drawing two large oval eyes about halfway down the head, leaving enough space between them for the nose. Add a small upside-down triangle for the nose, followed by a short vertical line that splits into two gentle curves to create a smiling mouth. Finish by drawing three whiskers on each side of the face. Keep your lines light until you’re happy with the placement. A common beginner mistake is drawing the eyes too close together, which can make the face look crowded. Imagine an eye’s width of space between them to create a balanced, cheerful appearance that’s perfect for kids and beginners.
Step 7 – Refine the Cat Outline
Your drawing already looks like a cat, so this step focuses on turning the construction shapes into a clean cat outline. Trace over the outer edges of the head, ears, body, legs, and tail using smoother, more confident pencil strokes. Round any sharp corners where the head meets the body and soften the paws with gentle curves. If parts of your original guide shapes stick out, don’t worry, you’ll erase them in the next step. Take your time refining each section instead of tracing everything quickly. Slow, deliberate lines almost always look cleaner than rushed ones. If you’re learning how to draw a cat outline, this is the stage where your sketch transforms into a finished line drawing.
Step 8 – Add Small Details
Small details help your drawing feel more alive without making it difficult. Draw a curved line inside each ear to suggest the inner ear, add tiny curved lines between the paws to separate the toes, and sketch a few short fur marks around the cheeks and chest. You don’t need to cover the whole body with fur lines. A handful of carefully placed strokes creates texture while keeping the drawing clean and beginner-friendly. Avoid drawing long random fur lines everywhere, as this can make the cat appear messy. A helpful tip is to imagine the fur growing outward from the face and body rather than drawing lines in different directions.
Step 9 – Erase the Guidelines
This is the most satisfying part of the drawing process. Carefully erase the original circles and ovals that helped build the cat’s proportions, leaving only the clean outline and details behind. Work slowly around the face, ears, and paws so you don’t accidentally remove finished lines. If any outlines become too light after erasing, gently redraw them with your pencil or trace them with a black fineliner if you’d like a bold finished look. Before calling your drawing complete, compare the left and right sides one last time. Tiny adjustments to the ears, eyes, or tail can make a surprisingly big difference in the overall balance of your cat.
Step 10 – Color Your Cat
Your cat is finished, and coloring is a great way to make it unique. You can create a realistic pet by using orange, gray, black, white, or brown fur, or let your imagination take over with bright rainbow colors. Add lighter shades on the chest and belly to create contrast, and use a darker pencil around the edges for a little extra depth. Leave tiny white highlights in the eyes to make them sparkle. Remember that there isn’t a “correct” color for your drawing, every cat has its own personality. Once you’ve finished, challenge yourself to draw another cat with different ear shapes, tail positions, or fur patterns to build your confidence even more.
Drawing Tips
Learning how to draw a cat for beginners becomes much easier when you focus on simple shapes instead of tiny details. Start with light construction lines, and don’t worry if your first circle or oval isn’t perfect. You can always adjust your sketch as you go. Looking at your drawing from a short distance every few minutes is another helpful habit because it makes uneven proportions easier to spot.
Try drawing the same cat several times instead of aiming for perfection on the first attempt. Each sketch helps improve your control, confidence, and understanding of proportions. If you’d like to practice another familiar pet, follow our guide on How to Draw a Bunny or challenge yourself with How to Draw a Horse.
Common Mistakes
One of the most common mistakes is pressing too hard with the pencil during the first few steps. Dark construction lines are difficult to erase and can leave unwanted marks behind. Another frequent issue is making the head much smaller than the body, which throws off the proportions.
Many beginners also draw the eyes too high or too close together. Keeping the eyes centered on the head with enough space between them creates a friendlier expression. Finally, remember that tails should flow naturally with a smooth curve rather than sticking straight out.
Coloring Ideas
Cats come in an amazing variety of colors and patterns, so this is a wonderful chance to be creative.
You could color your drawing as:
- An orange tabby with darker stripes
- A black cat with bright yellow eyes
- A fluffy white cat with blue eyes
- A gray kitten with pink ears
- A brown cat with cream-colored paws
- A playful rainbow cat using your favorite colors
If you enjoy coloring animals after drawing them, you might also like How to Draw a Lion, How to Draw a Bear, How to Draw a Panda, or How to Draw a Dinosaur.
FAQs
Is this cat drawing suitable for beginners?
Yes! This tutorial is designed for complete beginners, including children and adults who have little or no drawing experience. By building the cat from simple circles, ovals, and triangles, you’ll learn the basic proportions before adding details. If you’re looking for how to draw a cat easy, following each step in order will help you create a balanced drawing without feeling overwhelmed.
How long does it take to draw a cat?
Most beginners can complete this drawing in about 20 to 30 minutes. If you’re taking your time to practice each shape or experiment with different colors, it may take a little longer. Remember that improving your drawing skills comes from practice, not speed.
Can kids follow this tutorial?
Absolutely! The lesson is written with young artists in mind, making it a great choice for parents, teachers, and homeschool activities. Because each step introduces only one new part of the drawing, children can build confidence as they work through the lesson. That’s what makes this guide ideal for anyone searching for how to draw a cat for kids.
What if my cat doesn’t look perfect?
That’s completely normal. Every artist draws a little differently, especially when they’re learning. Small differences in the ears, eyes, or tail give your drawing its own personality. Instead of erasing everything, compare your sketch with the previous step and make small adjustments. Each new drawing will look even better than the last.
What should I draw next?
Once you’ve mastered a simple cat, try practicing animals with different shapes and features. You can continue your drawing journey with How to Draw a Butterfly, How to Draw a Fish, How to Draw a Frog, How to Draw a Duck, or How to Draw a Chicken. When you’re ready for a bigger challenge, try How to Draw a Dragon or the magical How to Draw a Unicorn.
Conclusion
Congratulations! you’ve learned how to draw a cat using simple shapes, clean outlines, and easy-to-follow steps. From sketching the head and body to adding the face, tail, and finishing details, you’ve created a complete cat drawing that you can be proud of. Don’t stop with just one sketch. Try drawing cats in different poses, with fluffy or short fur, curled tails, or playful expressions. Every new drawing strengthens your observation skills and pencil control.
As you continue building your confidence, explore even more beginner-friendly animal tutorials. You can learn How to Draw a Shark, How to Draw a Snake, How to Draw a Turtle, or even prehistoric creatures with How to Draw a Dinosaur. The more animals you practice, the more comfortable you’ll become with drawing different body shapes, textures, and proportions.
Keep your sketchbook nearby, have fun experimenting, and remember that every great artist started with simple lines just like these.